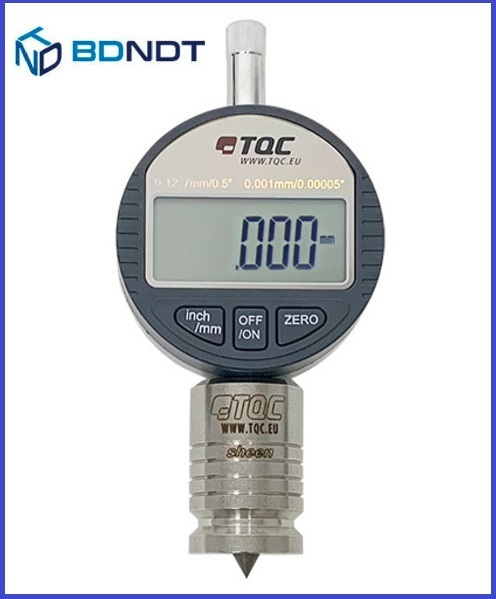
TQC Sheen Surface Profile and Coating Thickness Gauge
৳ 85,000.00৳ 90,000.00 (-6%)
Features
- Complies with: ISO 2808, ASTM D4417-B, JIS K 5600-1-7, BS EN ISO 2808, BS 3900-C5, IMO MSC.215(82)
- Combination gauge equipped with two different tips, for surface roughness and coating thickness.
- Supplied with a sharp tungsten carbide replaceable tip for surface profile measurement, a hardened round tip for coating thickness measurement, a glass plate for zero calibration and a leather carry pouch that fits all items.
- This instrument is precision-machined. Always clean the instrument after use with a soft dry cloth. Do not use compressed air to clean the instrument.
- Annual calibration recommended
Technical Attributes
Range: 0-3.4mm / 0-0.13 inch
Resolution: 1μm / 0.4 mil
Accuracy: ±5μm / 0.2 mil
Thread: M2.5 x 0.45
Stem Diameter: 8mm / 0.3 inch
TipPoint: 60° angle
Standards: ISO 2808-4B; ASTM D 4417-B; JIS K 5600-1-7; BS 3900-C5
Procedure
Measuring Roughness
- Press the On/Off button to switch the gauge on.
- Check if the right tip is chosen. (the sharp needle tip is suitable for measuring roughness)
- Choose parameter by pressing the IN/MM button.
- Place the needle of the gauge on the flat glass specimen (zero plate) and press the gage with the holder down until the base of the holder stands firmly on the zero plate.
- Press the ZERO button to make the instrument read zero.
- Place the needle gently on the blasted surface and press the base of the gauge-holder firmly against the steel. DO NOT drag the instrument.
- Read the peak-valley value.
- Make 10 measurements on each desired location and determine the mean as being the profile of the surface.
Measuring Thickness
- Press the On/Off button to switch the gauge on.
- Check if the right tip is chosen. (the round tip is suitable for measuring thickness)
- Choose parameter by pressing the IN/MM button.
- Place the needle of the gauge on the flat glass specimen (zero plate) and press the gauge with the holder down until the base of the holder stands firmly on the zero plate.
- Press the ZERO button to make the instrument read zero.
- Gently remove a piece of paint with a diameter of 8mm. from the surface. Try to remove the paint without damaging the underground material.
- Place the needle on the removed paint. Make sure the aluminum footing stands on the painted area.
- The Coating thickness appears on the display.
Changing the Gauge Tip
- Two tips are supplied. The sharp needle tip is suitable for measuring roughness, the round one for thickness.
- Take the tip between two fingers and turn anti-clockwise until it is loose. If the tip stays stuck, go to step 3.
- Only when loosening the tip anti-clockwise by hand fails, a pair of tongs may be used GENTLY. Make sure the tip remains undamaged.
- Turn the new tip clockwise until it’s stuck.
- The tips have been changed. Don’t forget to store the tip that’s not in use.



Reviews
There are no reviews yet.